
FREE DOWNLOAD – B.F.S. HOLDING
Explore the full spectrum of services and industries covered by B.F.S. Holding.
This document serves as the definitive Cuplock Scaffold Manual, a comprehensive technical guide engineered for site managers, assembly crews, and safety inspectors. It provides an in-depth exploration of the cuplock scaffolding system, detailing everything from initial component identification to advanced assembly procedures and critical safety verifications. This manual is designed to ensure that every installation is not only efficient but also compliant with the highest safety standards. By following this guide, teams can maximize the system’s benefits, including its renowned speed of erection, adaptability to complex geometries, and robust structural integrity for both access and formwork support applications. This guide will cover components, specifications, installation, safety, and maintenance.
What Is Cuplock Scaffolding System?
The cuplock scaffolding system is a highly-regarded, versatile, and efficient modular scaffolding solution used globally in construction, industrial, and maintenance projects. Its name is derived from its unique and robust “cup and lock” connection method. This mechanism, the core of the system’s design, involves a fixed lower cup welded to the vertical standards and a sliding, captive upper cup. When horizontal ledgers or transoms are placed into the lower cup, the upper cup is lowered and rotated. A hammer blow then secures the upper cup, creating a rigid, wedge-action lock that firmly connects up to four components at a single node point.
This innovative scaffolding locking system eliminates the need for loose fittings, nuts, bolts, or wedges, which are common in traditional tube-and-clamp scaffolds. The benefits of this design are manifold: it dramatically increases the speed of erection and dismantling, reduces the risk of lost components, and minimizes the need for highly skilled labor. The cuplock system is renowned for its exceptional rigidity, high load-bearing capacity, and adaptability, making it an ideal choice for complex facade access, circular or curved structures, and demanding shoring or formwork support.
Key Components of the Cuplock System
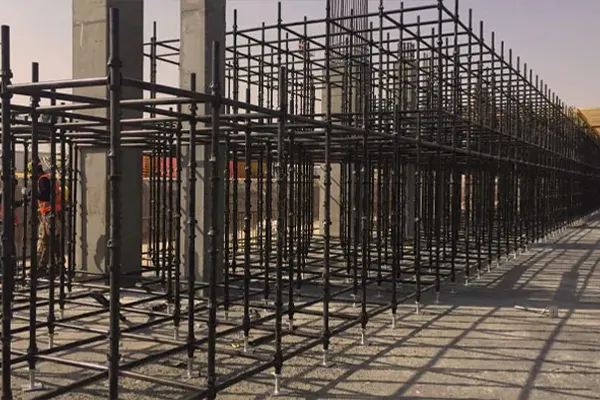
A thorough understanding of the cuplock scaffolding components is the first step toward safe and efficient assembly. Unlike traditional systems that rely on numerous loose couplers, the cuplock system is an integrated solution where each part is designed to fit together seamlessly. The primary components consist of vertical Standards (or verticals) and horizontal Ledgers (or horizontals). These are supplemented by a range of ancillary parts, including diagonal braces, base jacks, U-head jacks, intermediate transoms, cantilever frames (hop-up brackets), and platform components like steel boards or battens.

The ingenuity of the system lies in its simplicity and the robust nature of its parts. All primary components are typically manufactured from high-grade structural steel and are finished with a hot-dip galvanization process to protect against corrosion, ensuring a long service life even in harsh site conditions. The absence of loose fittings not only speeds up assembly but also simplifies logistics, transportation, and inventory management on-site. Each component has a specific function, from the load-bearing standards that provide vertical support to the ledgers that define the bay’s dimensions and the braces that ensure the entire structure is stable and rigid.
Standards and Ledgers
The Standards, or verticals, are the foundational load-bearing members of the cuplock scaffold. They are manufactured from high-strength steel tubing and feature the system’s signature bottom cups welded at fixed intervals, typically every 500mm or 1000mm. This fixed spacing allows for complete flexibility in platform height and ledger placement. At the top of each standard is an integrated spigot, which allows for the secure, end-to-end connection of additional standards, enabling the scaffold to be built to virtually any height. The bottom cup is a forged component designed to withstand high operational loads, while the top cup is a captive, malleable casting that cannot be accidentally separated from the standard.
Ledgers, or horizontals, are the primary horizontal members that connect the standards to form the scaffold’s “bay.” They dictate the longitudinal and transverse dimensions of the structure and serve as the main support for the working platforms and transoms. Each end of a ledger features a forged, hardened steel “blade” that is precisely shaped to slot into the bottom cup of the standard. When the top cup is locked, these blade ends are firmly wedged, creating an exceptionally rigid connection that prevents any movement. Ledgers come in various standard lengths to accommodate different bay sizes, providing significant design flexibility.
Diagonal Braces and Hop-Ups
Diagonal braces are a non-negotiable component for ensuring the stability and structural integrity of any cuplock scaffold. Their primary function is to prevent lateral “racking” or sway, stiffening the entire structure against operational and environmental loads, such as wind. Cuplock scaffolding bracing is typically installed diagonally across the face of the scaffold (face bracing) and also in a “zig-zag” or “tension” pattern from the base to the top lift (longitudinal bracing). These braces connect to the standards using either swivel or fixed blade ends that lock into the cups, or with supplementary scaffold couplers, ensuring the structure remains plumb and true.

Hop-up brackets, also known as cantilever frames or stage brackets, are ancillary components that add to the system’s versatility. These triangular brackets are designed to attach to the standards at a node point, allowing for the creation of a working platform that extends (cantilevers) beyond the main scaffold run. This is particularly useful for navigating obstructions, accessing recessed areas of a facade, or providing additional material storage space at a specific level. They are typically available in one, two, or three-board widths and must be installed with proper guardrails and toe boards.
Top Cup and Bottom Cup Mechanism
The locking mechanism is the heart of the cup and lock scaffolding system. The Bottom Cup is a high-strength, forged steel component that is robotically welded to the standard at precise 500mm intervals. Its bowl-like shape is designed to accept up to four component ends (ledgers or transoms) simultaneously, allowing for connections to be made at 90-degree angles, which is ideal for square or rectangular builds. The cup’s design automatically aligns the ledgers at the correct height, ensuring a level and consistent lift.
The Top Cup is a captive, malleable iron casting that slides freely along the standard’s vertical axis but cannot be removed. After the ledger blade ends are placed into the bottom cup, the top cup is lowered over them. A simple, positive-locking action, typically a 90-degree rotation facilitated by a hammer blow, causes the top cup’s internal profile to engage with the ledger blades. This action securely wedges the blades into the bottom cup, creating an incredibly rigid, positive-load connection that is resistant to vibration and impact. This entire operation takes seconds, highlighting the system’s efficiency.
Technical Specifications and Material Standards
The safety and performance of a cuplock system are directly dependent on its adherence to strict technical specifications and material standards. Reputable manufacturers produce cuplock scaffolding specifications that comply with international and regional standards, such as EN 12810/12811 (Europe) or ANSI/SSFI SC100-5/05 (North America). The primary components are almost universally manufactured from high-yield-strength structural steel, typically Grade S355, which provides an excellent balance of strength and durability. The outer diameter (O.D.) of the standards and ledgers is typically 48.3mm, making them compatible with standard scaffold couplers and fittings.

To ensure longevity and resistance to environmental corrosion, all steel components undergo a hot-dip galvanization process. This protective zinc coating is applied after all welding and forging are complete, ensuring total coverage, including on internal surfaces. The wall thickness of the tubing is a critical factor in determining load capacity; standards commonly have a wall thickness of 3.2mm or 4.0mm, while ledgers are typically 3.0mm or 3.2mm. All forged and cast components, like cup-ends and top cups, are precision-engineered to ensure a perfect fit and reliable locking action.
Step-by-Step Installation Procedure
The cuplock scaffolding installation procedure is prized for its speed and simplicity. However, it must be conducted systematically by trained and competent personnel. The entire process must be overseen by a qualified scaffold supervisor, and a site-specific design or erection plan should be in place before any work begins. This sequence ensures that stability is built into the structure from the ground up, with safety checks performed at every stage.
This procedure follows a logical, lift-by-lift sequence. The foundational principle is to establish a perfectly level and plumb base, from which the rest of the structure can be built vertically. Each lift must be fully braced and planked, with all locking mechanisms engaged, before the next lift is started. This methodical approach is the key to a safe and stable scaffold.
Safety Note: Always conduct a pre-work site assessment and toolbox talk. All personnel involved in the assembly must be equipped with appropriate PPE, including hard hats, safety-toed boots, gloves, and a personal fall arrest system (PFAS) when working at height.
Step 1: Base Layout and Leveling
The foundation is the most critical part of the scaffold. Begin by clearing the foundation area of all debris and ensuring the ground is firm and capable of supporting the scaffold’s total load. On soil, asphalt, or other soft surfaces, timber or metal sole boards (also known as sole plates) must be laid to distribute the load and prevent the scaffold from sinking. Using the scaffold design drawing, measure and mark the positions for the standards. Place an adjustable screw base jack at each marked position, on top of the sole boards.
Using a spirit level, a water level, or a laser level, adjust each base jack so that the entire base layout is perfectly level in all directions. This is a non-negotiable step; any inaccuracies at the base will be amplified as the scaffold’s height increases, leading to a dangerously unstable structure. For scaffolds on a slope, the base jacks and varying-length standards are used to create a level first lift. The base jacks should have a robust thread and a collar to prevent over-extension.
Step 2: Fixing Standards and Ledgers
Once the base jacks are level, insert the first (base) Standards into the base jack sockets. It’s common practice to start the erection from the highest point of the ground. Connect the first four standards to form the initial “bay,” which will be the reference for the entire structure. Place the blade ends of the first-lift Ledgers into the lowest available bottom cups on the standards. This first lift of ledgers should be as close to the base as possible to provide maximum stability, typically at the first cup node just above the base jack collar.
With the ledger ends seated in the bottom cups, slide the captive top cups down over the blades. Use a scaffolder’s hammer to strike the lugs on the top cup, rotating it until it is tight. This action wedges the ledgers firmly in place. Check this first bay for “square” by measuring the diagonals. Once square, check that the standards are “plumb” (perfectly vertical) using a spirit level. Adjust the base jacks slightly if necessary until the bay is both level and plumb. Continue this process to erect the entire footprint of the first lift.
Step 3: Bracing and Stability Check
With the first lift’s footprint assembled, the structure must be immediately stabilized with diagonal bracing. Braces are critical for preventing lateral sway and must be installed in accordance with the design drawings. Install cuplock scaffolding bracing diagonally in both the longitudinal (face) and transverse (end-frame) directions. This “boxing-in” of the first lift provides essential rigidity and prevents the scaffold from “racking” or collapsing. Braces with cup-ends can be locked into the node points just like ledgers, while others may connect with swivel couplers.
After installing the bracing, conduct a thorough stability check. Re-check all standards with a long spirit level to ensure they remain perfectly plumb. Verify that every single top cup on the first lift has been fully engaged and tightened with a hammer. Push firmly on the structure to check for any sway or movement. The scaffold must be completely rigid, plumb, and stable before any decking is added or the second lift is started. This step is a critical safety control point in the erection sequence.
Step 4: Decking, Platforming, and Access Installation
Once the first lift is confirmed to be stable, the working platform can be installed. This typically involves laying steel scaffold boards (battens) or intermediate transoms and timber boards across the ledgers. Ensure the platforms are fully boarded, with no gaps, and that the boards are secured against uplift or displacement, often with integrated locking mechanisms. Install toe boards around the perimeter of all working platforms. Toe boards are a critical safety feature that prevents tools, materials, and debris from falling to the ground below.
At this stage, you must also install the safe access system, which is typically an internal ladder bay. This involves creating a dedicated bay with ladder access platforms and secure ladders providing transit between lifts. A safety gate or drop-bar should be installed at the platform entry point. To continue to the next lift, insert the spigot-ended standards of the second lift into the standards of the first. Repeat the process of fixing ledgers, checking for plumb, installing bracing, and then decking the next working level.
Step 5: Inspection and Safety Verification
Before the scaffold is put into service, a final, comprehensive inspection must be performed by a competent and qualified person. This inspection is a legal and safety requirement. The inspector must systematically check the entire structure, verifying that it has been built according to the design drawing and this manual. This check includes: confirming the foundation is sound; verifying all base jacks are level and not over-extended; checking that all standards are plumb; ensuring all ledgers and braces are in their correct positions; and physically checking that every top cup is securely locked.
The inspector must also verify the integrity of all working platforms, guardrails, and toe boards, and ensure the access points are safe. Once the scaffold is deemed safe, a “scaffold tag” (such as a green “Safe for Use” tag) must be affixed at all access points. This tag indicates the scaffold’s status, load capacity, and the date of inspection. The scaffold must be re-inspected at regular intervals (e.g., weekly) and after any event that could affect its stability, such as adverse weather, high winds, or any modification.
Safety Guidelines and Load Capacity Considerations
Safety is the paramount concern in all scaffolding operations. All assembly, modification, and dismantling must be performed under the supervision of a competent person. All personnel working on the scaffold must be trained in its use and in the recognition of potential hazards. Full Personal Protective Equipment (PPE) is mandatory at all times. This includes hard hats, safety-toed boots, high-visibility clothing, and gloves. When working at any height where a fall is possible (typically 2m or more), a personal fall arrest system (PFAS) consisting of a full-body harness and lanyard must be worn and correctly anchored.
The load capacity of the scaffold must be respected at all times. Overloading is a primary cause of scaffold collapse. Scaffolds are rated for specific duty loads (e.g., Light, Medium, or Heavy Duty), and this rating must be clearly posted on the scaffold tag. Never store more materials, tools, or equipment on a platform than its design load allows. The structure’s stability also relies on being tied to the building or an adjacent solid structure. These “ties” must be installed at intervals specified by the engineer or in the design plan to provide resistance against wind loads and operational forces.
Critical Safety Warning: Never use a scaffold that is incomplete, damaged, or has a “Do Not Use” tag. Always conduct a visual inspection of your work area before starting. Be constantly aware of your surroundings, including overhead power lines, changing weather conditions, and site traffic. Do not modify or remove any component (especially guardrails or braces) without proper authorization.
Maintenance and Dismantling Procedures
Proper maintenance is essential for ensuring the longevity and safety of cuplock components. Regular inspections should be conducted, even when components are in storage. Check for any signs of damage, such as bending, cracking in welds, or significant deformation from impact. Components with excessive rust or corrosion that compromises the steel’s thickness should be removed from service. The most critical maintenance task for cuplock is to keep the cup mechanisms clean. Concrete, grout, and other site debris can clog the bottom cups or seize the top cups, preventing a secure lock. Components should be cleaned regularly.

The dismantling procedure is the reverse of the assembly process and must be planned with the same level of care. Dismantling presents significant risks, as the structure’s stability is progressively reduced. The process must begin from the top lift and proceed downwards. Never remove lower-level components while upper lifts are still in place. Before beginning, clear the top lift of all materials and debris. Dismantle guardrails, toe boards, and platforms first. Then, unlock and remove the ledgers and braces for that lift. Components should be lowered to the ground in a controlled manner (e.g., via a gin wheel or crane); never throw components from height. Ensure the scaffold remains stable and braced at all times during the entire dismantling sequence.
Comparison: Cuplock vs Ringlock and Tube-Clamp Systems
When evaluating the best scaffolding systems, it’s useful to compare cuplock to its main alternatives. The most direct competitor is the Ringlock (or Rosette) system. Both are modular systems that are much faster to erect than traditional scaffolds. The primary difference is the connection point: Ringlock uses a circular “rosette” plate welded to the standard, which features pre-cut holes that accept wedge-headed ledgers. This system typically offers more connection angles (up to 8), making it exceptionally flexible for complex geometric shapes, such as those found in industrial plants or circular tanks. Cuplock, with its four-way connection, is simpler and often considered faster for more linear structures, such as building facades.
The comparison to traditional Tube-and-Clamp scaffolding is one of versatility versus efficiency. Tube-and-clamp, which uses separate tubes and load-bearing couplers, is infinitely adjustable, as fittings can be placed anywhere. However, this flexibility comes at a significant cost in labor and time. It requires a higher level of scaffolder skill to ensure every joint is tightened correctly and the structure is plumb and braced. The cuplock system, with its fixed, built-in node points, drastically reduces assembly time, minimizes the risk of human error in jointing, and has far fewer loose components to manage, making it a more efficient and inherently safer system for most applications.
Applications of Cuplock Scaffolding in Construction and Formwork
The versatility of the cuplock scaffolding system makes it suitable for a vast array of applications beyond simple facade access. Its speed of assembly makes it a preferred choice for fast-track construction projects, turnaround and shutdown maintenance in industrial plants, and in shipbuilding or offshore rig fabrication. The system’s high-strength components and rigid, positive-lock connection points make it an ideal solution for general-purpose access scaffolding of any height or configuration. Leading systems, like those from manufacturers such as Pal Scaffolding or BFS Industries, are designed to meet these diverse needs.
A key application for cuplock is its use as a shoring or falsework system, often referred to as a cuplock formwork system . In this role, the scaffold is erected to support the temporary formwork used to cast in-situ concrete slabs, beams, and columns. The high-capacity standards, combined with heavy-duty ledgers and jacks, can be assembled into a “birdcage” or tower structure capable of supporting immense vertical loads from wet concrete. This highlights the important Difference Between Shoring and Scaffolding; cuplock excels at both, serving as a vertical load support system (shoring) as well as a working platform (scaffolding).
Troubleshooting Common Installation Issues
Even with a simple system, issues can arise. Knowing how to troubleshoot them is key to a safe and efficient build. One of the most common issues is the scaffold “racking” or leaning. This is almost always caused by an improperly leveled base or insufficient diagonal bracing. The solution is to halt erection, re-level the base jacks, and ensure all required face and plan braces are installed as per the design drawings. Use a spirit level on every lift to catch this problem early.

Another common issue is a top cup that will not lock or rotate. This is typically caused by debris (such as dried concrete, grout, or dirt) lodged in the bottom cup, preventing the ledger blade from seating fully. It can also be caused by an attempt to lock the cup before all ledgers in that node are correctly seated. The solution is to remove the ledgers, thoroughly clean the bottom cup, and re-insert the components, ensuring they are all fully seated before dropping and rotating the top cup. Never force a top cup; a correctly seated lock should only require a firm hammer blow to secure. If platforms are uneven, it indicates the ledgers on which they rest are not level, which traces back to an issue with the base or the plumbness of the standards.
Conclusion: Why Choose BFS Industries Cuplock Systems
The Cuplock scaffolding system has established itself as a global standard for a reason. Its design combines speed, safety, and power in one efficient package. By eliminating loose fittings and providing a simple, positive-locking mechanism, it reduces labor costs, minimizes component loss, and significantly enhances site safety by removing many of the variables and risks associated with traditional scaffolding. Its adaptability for both complex access and heavy-duty shoring applications makes it a versatile and economical choice for any project.
For a reliable, high-quality cuplock scaffolding system that meets all required technical specifications and safety standards, trust the experts at BFS Industries. We are a leading manufacturer and supplier of cuplock components, ensuring every standard, ledger, and cup that leaves our facility is engineered for maximum durability and performance. Our commitment to quality ensures your site remains safe, productive, and compliant. Contact us today to learn how our cuplock solutions can support your next project.
Frequently Asked Questions (FAQ)
Q1: What are the main parts of Cuplock scaffolding?
A: The main parts are the Standards (verticals with cups), Ledgers (horizontals with blade ends), the captive Top Cup, and the welded-on Bottom Cup. Ancillary parts include diagonal braces, base jacks, U-head jacks, platforms (steel boards), and toe boards.
Q2: How to install a Cuplock scaffold system?
A: The basic installation procedure is:
- Establish a firm, level foundation using sole boards and adjustable base jacks.
- Erect the first bay of Standards and Ledgers, locking the cups with a hammer.
- Install diagonal bracing to make the first lift rigid and “plumb” (vertical).
- Install the first working platform (deck) with guardrails and toe boards.
- Install an access ladder.
- Repeat the process for subsequent lifts, connecting standards vertically with their spigots.
Q3: What are the standard specifications of the Cuplock system?
A: Typically, standards and ledgers are made from 48.3mm O.D. high-grade steel (like S355) with a wall thickness of 3.0mm to 4.0mm. The components are hot-dip galvanized for corrosion resistance. The fixed bottom cups are welded on standards at 500mm or 1000mm intervals.
Q4: What safety measures should be followed during Cuplock scaffolding assembly?
A: Key safety measures include: ensuring a firm and level base, using full PPE (especially fall arrest systems), installing guardrails and toe boards on all platforms, ensuring all diagonal braces are installed as per the design, and having a competent person inspect the scaffold and apply a “Safe for Use” tag before it is accessed.
Q5: What is the difference between Cuplock and Ringlock scaffolding?
A: Both are modular systems, but their locking mechanism differs. Cuplock uses a two-piece “cup” (a fixed bottom and a sliding top) that locks up to four components. Ringlock uses a “rosette” (a circular plate with holes) welded to the standard, and ledgers with “wedge heads” lock into the holes. Ringlock typically offers more connection angles (up to 8) and is often favored for highly complex industrial geometries.