
FREE DOWNLOAD – B.F.S. HOLDING
Explore the full spectrum of services and industries covered by B.F.S. Holding.
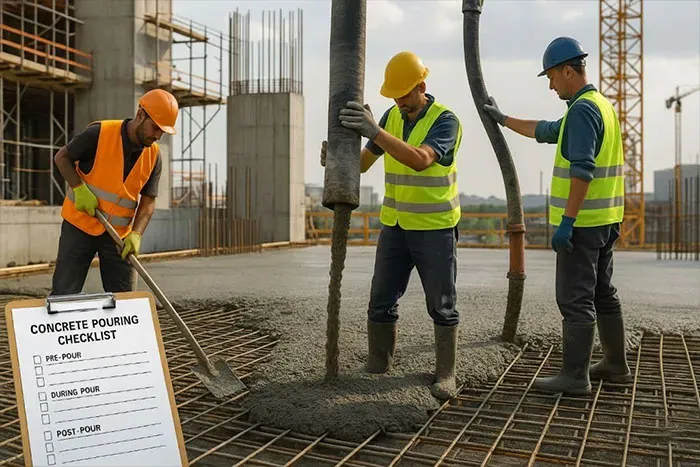
The successful execution of a concrete pour is the foundation of any lasting structure, yet this critical stage is fraught with potential pitfalls that can compromise the durability, strength, and overall compliance of a project. To mitigate these risks, implementing a rigorous, multi-stage concrete pouring checklist is absolutely essential. This document serves as a comprehensive, three-phase guide—covering pre-pour verification, during-pour monitoring, and post-pour protection—designed to standardize quality control across all construction sites. By following this meticulous process, project managers, site supervisors, and quality assurance teams can ensure that every element, from the material composition to the final curing process, meets the most stringent engineering and safety specifications. This systematic approach is the bedrock of reliable, high-performance concrete work, guaranteeing the structural integrity that is synonymous with reliability in the construction industry, particularly when working with trusted suppliers like BFS Industries, a leader in formwork and concrete equipment manufacturing.
Why a Concrete Pouring Checklist Is Essential
In the dynamic environment of a construction site, reliance on memory or ad-hoc processes inevitably leads to costly errors, structural defects, or delays. A structured checklist, such as this one, is not merely a formality; it is a vital quality control instrument that institutionalizes best practices and ensures absolute adherence to project specifications and regulatory codes. It creates a paper trail, or digital log, that can be used for final engineer sign-off and, crucially, acts as indispensable evidence in the event of future disputes or failure analysis, protecting both the client and the contractor from liability.
A rigorous concrete pouring inspection checklist provides an unequivocal standard against which all site personnel—from the formwork crew and rebar installers to the mixer truck drivers and vibrator operators—can be held accountable. It shifts the project culture from reactive problem-solving to proactive prevention, helping teams anticipate and address variables like fluctuating ambient temperature, unanticipated material substitution, or improper slump rates before they become permanent flaws in the finished element. This mandatory step-by-step verification process guarantees that the transition from a design blueprint to a load-bearing structure is executed with precision.

Pre-Pour Inspection Checklist
The pre-pour inspection is arguably the most critical phase, as defects missed here are almost impossible to remedy once the concrete is placed. This comprehensive segment of the checklist for concrete work ensures that the foundation, formwork, reinforcement, and material are all perfectly aligned with the structural drawings and engineering specifications, setting the stage for a successful, high-quality pour. This section acts as a final gate, requiring sign-off from the site engineer before any concrete truck is permitted to unload on site, eliminating guesswork and securing confidence in the project’s preparatory work.

1. Site Preparation and Formwork Setup
Site preparation begins with confirming the sub-grade or foundation surface is stable, compacted correctly, and free of debris, standing water, or excessively dry soil that could draw moisture from the fresh mix. All required Concrete foundation types must have their dimensions and elevations checked against the plans using verified survey points. For vertical elements, the formwork—whether for walls, slabs, or custom structures like those utilizing manhole forms—must be inspected for dimensional accuracy, ensuring the final element is within tolerance for plumb, level, and squareness. Critical attention must be paid to the rigidity of the formwork, confirming that all ties, wedges, and bracing are correctly installed and torqued to prevent blowouts or shifting under the immense hydrostatic pressure exerted by the wet concrete. The use of specialized equipment like Concrete Column Formwork demands precision alignment to prevent misalignment that affects structural aesthetics and load transfer.
2. Material Inspection and Mix Verification
Before batching or delivery, the quality and compliance of the raw materials must be verified, starting with the concrete mix design ticket. This documentation must explicitly confirm that the specified strength (e.g., 4000 psi), slump range (e.g., 4 to 6 inches), air content, and admixture types (e.g., water reducers, retarders) are all correct and match the project’s specifications. Upon the mixer truck’s arrival, a visual inspection is mandatory to check for excessive water, segregation, or foreign materials, followed by a time-stamped log of the truck’s departure from the batch plant to confirm the concrete is placed within the maximum allowable duration (typically 90 minutes) to avoid premature setting. Failure to verify these parameters can lead to a concrete mix that is unworkable, structurally weak, or vulnerable to premature deterioration from environmental factors.
3. Reinforcement and Embedment Verification
The steel reinforcement, or rebar, is the skeletal structure that provides concrete with its tensile strength, making its accurate placement non-negotiable. Verification involves checking the rebar grade, size (diameter), spacing, and lap lengths against the structural drawings, ensuring that sufficient concrete cover is maintained by using approved bar chairs, spacers, or bolsters. All splices and connections must be secured with proper tie wire, and any penetrations or embedded items—such as anchor bolts, sleeves for MEP (Mechanical, Electrical, Plumbing) services, or connection plates—must be correctly positioned, held firmly in place, and adequately clean of any rust or contaminants that could compromise the concrete bond or later corrode. Incorrect reinforcement placement is a common cause of structural failure, making this segment a high-priority step on any concrete pouring inspection checklist.
4. Equipment Readiness and Safety Measures
A pre-pour check must confirm that all necessary equipment is on-site, fully operational, and correctly staged for the pour sequence. This includes the concrete pump, booms, hoppers, hoses, and power floats, ensuring they are free of residual concrete from previous jobs and adequately lubricated. Crucially, all internal and external concrete vibrators must be tested immediately before use to confirm they are functioning at the correct frequency and amplitude, with appropriate spares kept on standby to avoid delays. Simultaneously, a final safety sweep must confirm that all required guardrails, access points, temporary lighting, and personal protective equipment (PPE)—including appropriate footwear, gloves, and eye protection—are available for all workers, guaranteeing compliance with construction safety regulations before the first batch is poured.
During-Pour Checklist
The during-pour phase focuses on monitoring the quality of the concrete as it is placed and consolidated, requiring constant vigilance and real-time decision-making from the site supervisor. This is the period where corrective actions can still be taken, or potentially compromised loads can be rejected, preventing the incorporation of substandard material into the permanent structure. Continuous monitoring of placement depth and rate ensures that the formwork remains stable and the material performs as designed under dynamic site conditions.

1. Concrete Placement Techniques and Layering
The placement of concrete must follow a systematic sequence to minimize segregation, prevent air pockets, and ensure monolithic integration of layers. Concrete must be deposited as close as possible to its final resting location, avoiding excessive horizontal movement, which can cause the coarse aggregate to separate from the cement paste. When pouring vertical elements, the concrete should be placed in controlled, horizontal layers, typically not exceeding 2 feet in depth, allowing each layer to be properly compacted before the next is added. The delivery rate of the concrete must be matched carefully to the team’s ability to spread, vibrate, and level the material, preventing the build-up of material that could overstress the formwork or lead to uneven consolidation, ensuring a high quality outcome.
2. Compaction and Vibration Procedures
Proper concrete compaction is non-negotiable for achieving the specified compressive strength and reducing permeability. The concrete placement checklist mandates that all concrete must be thoroughly consolidated immediately after placement using mechanical vibrators. Internal vibrators should be inserted vertically into the concrete, penetrating the layer below by at least 6 inches to ensure effective inter-layer bonding, and then withdrawn slowly. The spacing between insertions should allow the radius of influence of the vibrator to overlap slightly, ensuring no air voids (honeycombing) remain, particularly near form faces, embedded items, and congested reinforcement areas. Over-vibration must be avoided, as it can lead to segregation, floating lighter aggregate to the surface and weakening the mix below the surface.
3. Temperature, Slump, and Workability Monitoring
Continuous quality control testing is mandatory throughout the pour, focusing on three key parameters: temperature, slump, and the production of test cylinders. The temperature of the delivered concrete must be recorded for every truck, ensuring it falls within the specified range (typically 50°F to 90°F or 10°C to 32°C) to prevent issues related to rapid hydration or freezing. A slump test must be performed for every load or at specified intervals (e.g., every 50 cubic yards) to verify the concrete’s consistency and workability, confirming it remains within the design tolerance before it is placed. Additionally, representative samples must be taken to cast specified quantities of test cylinders (e.g., six per batch) which are then properly labeled, stored, and cured for subsequent compression strength testing at 7, 14, and 28 days.
Post-Pour Checklist
Once the concrete is placed and consolidated, the post-pour phase is critical for preserving the quality and strength developed during the initial setting. This involves protecting the surface from damage, executing the finishing steps, and most importantly, managing the curing process to ensure maximum hydration and long-term durability. Neglecting these final steps can lead to shrinkage cracks, inadequate strength development, and surface degradation.

1. Finishing and Surface Leveling
The finishing operation begins as the concrete surface starts to lose its plasticity and the bleed water has evaporated, a state known as the stiffening phase. The surface must first be struck off and screeded to the correct elevation and profile, followed by bull-floating to eliminate localized irregularities and push down the coarse aggregate. Troweling, whether by hand or machine, must be executed at the correct time—not too early (which brings excessive fines to the surface) and not too late (which makes leveling impossible)—to produce the required surface texture and density, whether it is a broom finish for grip or a hard-troweled finish for wear resistance. All finishing activities must be completed before the concrete achieves its initial set, ensuring a monolithic and aesthetically acceptable surface.
2. Initial Curing and Protection Procedures
Effective curing begins immediately after the final finishing, as the process of hydration requires a continuous presence of moisture and a stable temperature. The curing procedure must be established beforehand and commence without delay, whether through applying liquid membrane-forming curing compounds, ponding water, continuous sprinkling, or covering the surface with wet burlap or plastic sheets. This action is essential to minimize the evaporation of water, preventing surface shrinkage cracks and ensuring that the cement fully hydrates to reach its designed strength. Furthermore, the fresh concrete must be protected from external factors, including heavy rain, freezing temperatures, direct hot sun, and any damaging foot or equipment traffic for the specified duration, typically the first 7 days, to avoid permanent surface flaws and strength loss.
3. Preventing Cold Joints and Cracking
A cold joint in concrete occurs when a fresh batch of concrete is placed against concrete that has already set, resulting in a plane of weakness that compromises the structural element’s integrity and watertightness. The post pour concrete checklist must document the placement rate and schedule of construction joints to actively prevent this. If pouring must be interrupted for longer than the initial setting time of the mix, a construction joint must be formed and prepared correctly. To prevent surface cracking, control joints must be saw-cut into slabs as soon as the concrete is hard enough not to ravel (typically within 4 to 12 hours) to guide inevitable shrinkage stresses to specific, planned locations. The proper management of pours, especially for complex elements such as cold joints in concrete columns, requires strict scheduling and communication between the batch plant and the site team to maintain continuity and monolithicity.
Quality Control and Documentation
Comprehensive documentation is the critical counterpart to physical inspection, transforming site work into auditable evidence of quality and compliance. Every step of the concrete pouring checklist must be formally logged, dated, and signed by the responsible party—be it the formwork contractor, the testing agency technician, or the site engineer. This section outlines the necessary records required to create an irrefutable history of the pour.

1. Test Reports and Record Keeping
Detailed records must be maintained for all quality assurance and quality control (QA/QC) tests performed. This includes the batch ticket number, the time of arrival and placement of each concrete truck, and the corresponding slump, air content, and temperature results. Photographs should be taken at various stages of the pre-pour inspection (formwork, rebar, embedments) and during the pour (vibrator use, placement depth) to provide visual evidence of compliance. All cube or cylinder compression test results, clearly linked to the corresponding truck and placement location, must be filed immediately upon receipt, ensuring the final report includes the 7-day, 14-day, and 28-day strength development curves to demonstrate that the concrete has met its design strength.
2. Inspection Logs and Engineer Approval
The site must utilize formal, standardized inspection logs—often provided in a format suitable for an excel concrete pouring checklist or a dedicated software application—to track sign-offs. These logs must include distinct sign-off points for key milestones, such as “Rebar Clear for Pour,” “Formwork Dimensions Verified,” and “Curing Procedures Initiated.” Crucially, the final permission to commence pouring must be given and documented by the responsible engineer or quality manager. No concrete should be placed before a mandatory hold point is released, confirming that all preceding elements, including the preparation of the sub-base and the adherence to Concrete foundation types specifications, have been thoroughly examined and approved against the project specifications, preventing avoidable mistakes.
Safety and Environmental Checklist
While the primary focus is on structural quality, the construction safety checklist for concrete pouring must be equally rigorous, protecting site personnel and minimizing the project’s environmental impact. Concrete work involves significant risk, including chemical burns, crushing hazards from mobile equipment, and exposure to silica dust during finishing and clean-up.

1. PPE and Worker Safety Compliance
Before the pour begins, a mandatory safety briefing must be conducted for all personnel involved, specifically addressing concrete handling hazards and the use of power tools. All workers must wear the required Personal Protective Equipment (PPE), including high-visibility clothing, hard hats, safety glasses, and, most importantly, chemical-resistant gloves and boots to protect against the highly alkaline nature of wet concrete, which can cause severe burns. Special attention must be paid to working at heights—confirming that scaffoldings and platforms are certified, load-rated, and fitted with proper fall protection—and ensuring all concrete pumps and mobile equipment have valid inspections and designated signal personnel to direct their movements safely across the site.
2. Waste Management and Spill Control
An environmental strategy must be in place to manage concrete washout and spill containment. Designated, lined washout areas must be established on-site for cleaning mixer chutes, pumps, and hand tools, ensuring that highly alkaline wastewater is prevented from infiltrating ground soil or stormwater drains. A readily available spill kit, including shovels, absorbent materials, and containment barriers, is required to manage any potential accidental spills of fresh concrete, fuel, or hydraulic fluids. All segregated construction waste, including demolished formwork materials, curing paper, and plastic sheeting, must be collected and disposed of according to local environmental regulations, maintaining a clean and responsible construction site throughout the duration of the pour.
Final Concrete Pour Review and Handover
The final stage of the quality control concrete checklist involves a comprehensive review of the executed pour and the formal handover of documentation. This ensures that the completed concrete element is fully compliant, structurally sound, and ready for the next phase of construction, such as formwork striking or load application. The review process requires a visual inspection of the demolded element (where applicable), checking for signs of honeycombing, surface voids, or dimensional inconsistencies, and comparing the actual surface finish to the specified requirements. Any identified defects, such as bug holes or minor surface irregularities, must be logged, assessed, and remediated using approved repair methods and materials before the element is passed.
This final review validates that all required tests have been performed, and all minimum strength requirements have been met, as evidenced by the 28-day compression test results. The handover includes the organized delivery of all QA/QC files, safety logs, and as-built drawings to the client or general contractor. This rigorous closure process ensures complete transparency regarding the quality of the poured element, affirming that the work aligns with the project’s high standards and preparing the site for subsequent structural work, thereby minimizing potential long-term liability.
Downloadable Concrete Pouring Checklist Template (PDF & Excel)
To facilitate the immediate implementation of these critical quality control steps, we have compiled the core elements of this technical guide into a simple, multi-stage template. This downloadable resource is intended to be used as a mandatory sign-off sheet for every concrete pour performed on your project, ensuring every critical parameter is physically verified. The table below represents a condensed, actionable version of the comprehensive checklist provided in this article, perfect for on-site use. We recommend downloading the full free concrete pouring checklist template in both PDF (for easy printing and manual sign-off) and Excel (for digital logging and custom adaptation) formats.
| Checklist Stage | Item | Required Check/Action | Verified By (Signature) | Date/Time |
|---|---|---|---|---|
| I. Pre-Pour | Sub-Base/Foundation | Grade, cleanliness, moisture level checked. | ||
| Formwork/Shoring | Plumb, alignment, rigidity, bracing checked. | |||
| Reinforcement | Rebar size, spacing, cover, and ties verified. | |||
| Embedments/Penetrations | Correctly placed, secured, and cleaned. | |||
| Equipment | Pump, vibrators, and finishing tools operational. | |||
| II. During-Pour | Mix Ticket | Strength, slump, and mix type match specifications. | ||
| Slump/Temp Test | Results recorded and within tolerance (e.g., 5″ ± 1″). | |||
| Placement Technique | Controlled lifts (max 2ft), minimal segregation. | |||
| Compaction | Thorough, systematic vibration (6″ overlap). | |||
| Test Cylinders | Samples taken, labeled, and placed in curing box. | |||
| III. Post-Pour | Finishing | Surface struck off, floated, and troweled as specified. | ||
| Curing Method | Approved method (membrane/water/burlap) applied. | |||
| Protection | Element shielded from sun, wind, rain, and traffic. | |||
| Joints | Control joints cut/formed within specified window. |
Conclusion – Ensure Perfect Concrete Work with BFS Industries Expertise
Adopting a detailed, systematic concrete pouring checklist is the single most effective action a construction team can take to guarantee the longevity, durability, and compliance of their concrete elements. From the initial pre-pour inspection to the final curing and joint control, adherence to this step-by-step process mitigates the vast majority of common structural risks and defects. By institutionalizing this level of rigorous quality control, you ensure that every concrete element is robust, aesthetic, and fully compliant with project specifications.
At BFS Industries, we understand that quality begins with the right tools. As a trusted concrete wall formwork supplier, we engineer our products to integrate seamlessly into a quality assurance process like this, providing the rigid, precision-manufactured forms that make passing the formwork section of your checklist easier and more reliable. We are committed to supplying the infrastructure that builds modern society, and that journey starts with a perfect pour. Contact us today to learn more about our high-performance formwork solutions that empower your team to achieve zero-defect construction.
Frequently Asked Questions (FAQ)
What should be checked before concrete pouring?
The comprehensive pre-pour check is a critical inspection phase that covers four key areas: Formwork (plumb, level, rigidity, cleanliness), Reinforcement (size, spacing, cover, and secure tying), Site Conditions (sub-grade moisture, readiness of anchor bolts/embedments, and weather forecast), and Materials (mix ticket verification for specified strength, slump, and time of batching). An engineer must sign off on the formwork and rebar inspection before any concrete is allowed on site, utilizing a structured pre pour concrete checklist.
How do I ensure concrete quality during pouring?
Concrete quality during the pour is maintained by strict real-time monitoring of three essential elements: Slump and Temperature, which must be tested from the mixer truck on site to ensure compliance with the mix design; Placement, which involves controlling the rate and method of pouring to prevent segregation and minimize drops; and Compaction, which requires systematic and thorough use of mechanical vibrators to remove air voids and ensure dense consolidation without causing segregation, adhering to a strict concrete placement checklist.
What safety measures are needed during concrete pouring?
Safety during concrete pouring primarily involves protecting workers from physical and chemical hazards. Mandatory measures include requiring all personnel to wear appropriate PPE (chemical-resistant gloves, boots, high-visibility clothing, and hard hats) to prevent alkaline burns. Additional safety checks involve ensuring all scaffolding and work platforms have adequate fall protection, that traffic control plans for mixer trucks and pumps are enforced, and that the area is clear of trip hazards, as detailed in a thorough construction safety checklist for concrete pouring.
How to prevent cold joints during concrete pouring?
A cold joint, a structural weakness caused by fresh concrete meeting already-set concrete, is prevented primarily through planning and continuity. The key is to maintain a consistent pour rate with the batch plant delivery schedule to ensure that fresh concrete is always poured and vibrated against plastic concrete. If a significant delay is unavoidable, the pour must be stopped at a pre-planned construction joint location, where the set concrete must then be properly prepared (roughened and cleaned) before the subsequent pour, which is a vital step on the post pour concrete checklist.
Where can I download a concrete pouring checklist template?
You can download a practical free concrete pouring checklist template suitable for immediate site use from this article’s “Downloadable Concrete Pouring Checklist Template (PDF & Excel)” section above. These templates condense the detailed steps into an easy-to-use format, allowing for quick on-site verification and mandatory sign-offs for the pre-pour, during-pour, and post-pour stages, serving as an indispensable concrete work inspection checklist for all projects.